Showing posts with label tutorial. Show all posts

Friday, 18 October 2019

How to make a Wet Palette - DIY - Tutorial.

How to make a Wet Palette - DIY - Tutorial.


So Wet palettes are really blowing up in the hobby right now. I myself dont use a Wet Palette but decided i should try.
So whilst making my own Wet Palette i decided to make a video tutorial so you guys can see how to make your own Wet Palettes!

Let me know what you think! 
Have you got a Wet Palette? Do you like Wet palettes? Did you buy or make your own Wet Palette?

if you like what you see please take a look at our patreon page  HERE

How to make a Wet Palette - DIY - Tutorial.
 How to make a Wet Palette - DIY - Tutorial.

Tuesday, 19 May 2015

Tutorial: How to paint metal.

 Tutorial: How to paint metal.

Hi guys, heres a quick but handy tutorial on how we paint our metals at scifiwargamers!

Stage 1 Basecoat with Leadbelcher

Stage 2: wash with Nuln oil

Stage 3: Drybrush with Leadbelcher again.

Stage 4: Drybrush with Ironbreaker.

Stage 5: Drybrush or layer, with Runefang steel.


As always thank you very much for visiting the site----------if you have any questions or comments please feel free to share them!----------You can help us out by joining us on facebook here: https://www.facebook.com/Scifiwargamers or Following us on twitter Here: @Marsekay-------If youre feeling VERY generous,by using the donate button or finally just browsing the site! ----------Thanks for visiting from the SciFiWargamers team.

Sunday, 27 January 2013

Star Wars X-Wing: Starfield Board.

 Star Wars X-Wing: Starfield Board.

The Finished Board, sans scenery.

Hi guys, Today i built a new X-wing board, after buying some more "pets"

Super fast Weather Loach.


 This ones a "Weather Loach" and i thought it would be a lazy beast, sadly its the fastest thing ever when it comes out and i struggled to take photos... unlike this lazy sod.

Laziest most odd dog in the world, it has its own "invisibility cloak" and bottle toy.

Anyway! as its taking me a year and a day to produce my Hoth themed battle board, i thought i would knock out a quick and easy Star Field Board for my X-Wing games. People are fed up of flying over the wooden table top!

Luckily i managed to produce this with only bits i had laying about so it was super cheap, and super easy, not to mention super fast!

Heres how i made it.

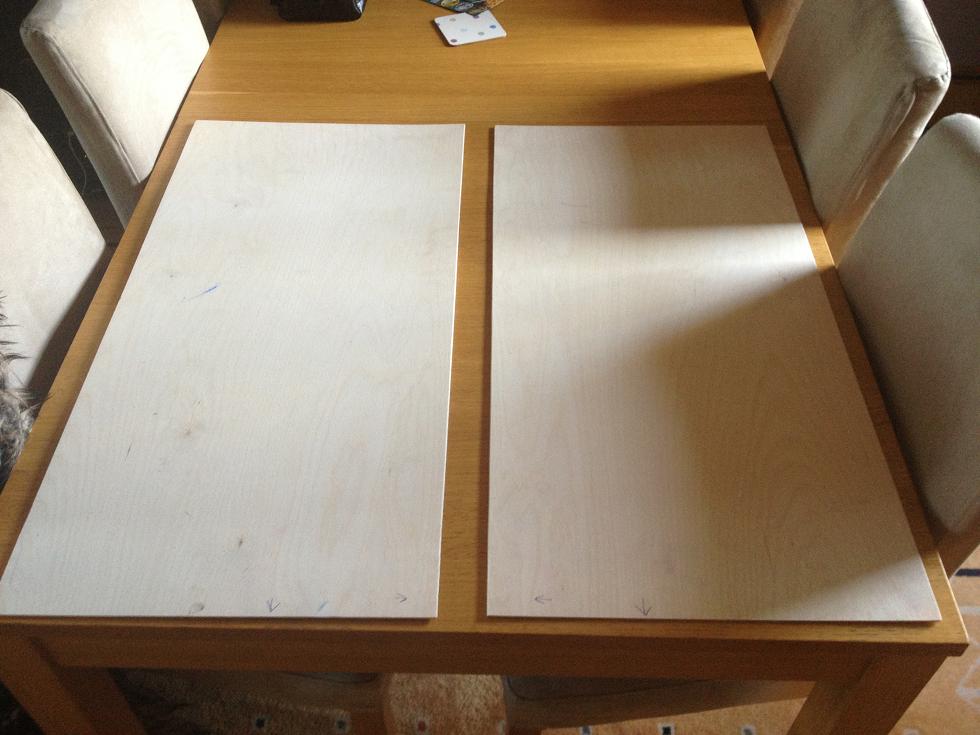
Firstly i Aquired 2 sheets of thin board that when laid together would provide a 36"x36" playing board which is the standard size for X-Wing games.

Two plain boards.

The two boards, when laid together look like this:

Potential playing board.

 I then dug out an old tin of cheap automotive spray paint!

Cheap and nasty aerosol.

 I used the spray to give each board a light dusting before going to town on them.

Hoping i had enough paint to last.

After that i thought it would be a good idea to spray round the edges first so they would be nice and covered.

Getting the edges right.
Again after that i gave each board another 3 layers of paint, 

After 2 layers of paint.

 After the third layer, and laying them together, i had this:

Three layers and looking solid.

Then it was time for more equipment! A Toothbrush (stole from the girlfriend) some white paint. and a pot for the paint.

Equipment for Stars, with added Girlfriend's Toothbrush.

Then i flicked the hell out of it, all over the place, It was GREAT fun! sadly it was all over too soon and i ended up with this:

The Finished Article.

Awesome don't you think!

Have you made an X-wing board yet? What boards have you made?


As always thank you very much for visiting the site, if you have any questions or comments please feel free to share them! You can help us out by liking us on FaceBook using the "Like" button, using the donate button or just browsing the site! Thanks for visiting from the SciFiWargamers team.

Saturday, 19 January 2013

Tutorial: How to Clean Forge World Resin Parts

 Well today i thought i would tackle a simple, yet often asked question.
Forge World Cleaning Station: ASSEMBLE!

How do you clean Forge World resin parts?

 First off i thought i would say WHY we clean our Forge World Resin parts. (and probably other companies parts also if you re thorough)

The reason is, during the molding process the company needs some type of chemical/product that is applied to the mold to aid release of the part when it is cured (dried/gone hard etc)

This "stuff" is called mold release, and it comes in MANY different forms. 

The reason you want to clean it off is obvious, if this stuff prevents the part sticking to the mold, its going to prevent paint etc sticking to the part.

So we wash it off.

All we need is a tub, some warm water, and some degreaser (i use fairy liquid!)

My source of hot water: a Kettle


Worlds best degreaser: Fairy Liquid
Then all you do is fill a tub with warm (not hot or it might warp the parts, but thats for another day) water with some fairy liquid in.

Soaking in the tub

Then chuck your parts in, leave em to soak for a little while, give em a rub, i use a small old toothbrush for this) then rinse and repeat!

I like to do the toothbrush scrub rub at least twice.

then all you do is leave them to dry and jobs a "good un"!


As always thank you very much for visiting the site, if you have any questions or comments please feel free to share them! You can help us out by using the donate button or just browsing the site! Thanks for visiting from the SciFiWargamers team.

Saturday, 12 January 2013

Tutorial: DIY Lightbox (super cheap and easy)

Hi all, Today i am going to show you how to make a DIY light box on the cheap! so put down your ipad2 and come have a go!


I use mine to photograph all my finished miniatures, be it forge world tanks (you might need a bigger box!) the usual games workshop space marines and so on. You really can use them for anything you want to take photographs of! it does not have to be war gaming related!

All you need is a cardboard box, some paper, a printer and some sticky tape!

Ok, step one, take your box and cut out one end and the top or bottom, then cover the inside with white paper


After you have covered the insides, add a blue gradient to the bottom and rear of the box, making sure it curves rather than folds at the back corner

Next put a light above the box, add a miniature and take pictures!


You can see here the imperial guard sentinel i tested it with.

The pictures come out like this


 Try it and see how you get on!


As always thank you very much for visiting the site, if you have any questions or comments please feel free to share them! You can help us out by using the donate button or just browsing the site! Thanks for visiting from the SciFiWargamers team.

Priming your minatures, save money and get better results.

Hi all, While building my Rainbow warriors captain lysander, i decided used a different method of priming. I used to spend a LOT of money on primer for my miniatures, either buying GW's chaos black/Skull white or Halfords grey primer.

These aerosols are not cheap at all. they also have the added drawback of smelling, and having to use them outside.

I am now going to show you how to save a ton of money and save you going outside risking life and limb in cold rainy weather!

First all you need is an airbrush. (if you do not have one i recommend one!) then a bottle of airbrush primer like this.


then all you do is paint it with the primer using your airbrush, getting results like so:


I'm really pleased with the results and all i used was a few ml of paint from the bottle! had i used spray primer i would have wasted LOADS. This has saved me a lot of money.

This pot costs around £2 and i'm sure will cover the same amount of minis as a £9 aerosol...

This works REALLY well when priming single miniatures, or small squads. if priming something huge, like a piece of terrain for example i would still go aerosol but for minis and tanks, i feel this is DEFINATELY more suitable.

You can even buy this primer in different colours from Vallejo stockists, and also in bigger pots, saving you EVEN MORE money per ml.

This is the way i'm going in future!

Adios spraying expensive aerosol cans in the wind in winter!

what do you use to prime your models? how does it go for you?


As always thank you very much for visiting the site, if you have any questions or comments please feel free to share them! You can help us out by using the donate button or just browsing the site! Thanks for visiting from the SciFiWargamers team.

Hobby Esentials: Hairdryer

 This is an oldie but a definate goodie!

Its often overlooked, but the trusty hairdryer can be a painters greatest ally in the war against drying times!
Ive wanted one for ages, but always though tthey were expensive?

Well Argos came to my rescue as they sell this wonderfully cheap value hairdryer!

For under £5 you cant say no!

if you do not own one, i URGE you to go get one now! no more waiting for those damn devlan mud washes (now known as Agrax Earthshade) to dry!


As always thank you very much for visiting the site, if you havve any questions or comments please feel free to share them! You can help us out by viewing any of the adverts on the side of the page, using the donate button or just browsing the site! Thanks for visiting from the SciFiWargamers team.

How to improve your painting in one step


 No, it's not paint Angron himself. Actually I'm willing to bet there are any number of things you could do to improve your painting, but this would be my top recommendation.

Find something different to paint.

That's right, paint something you don't normally paint. Something completely different than what you're used to painting. The further away, the better I think. If all you ever painted were Space Marines, try something from the Fantasy range or better yet, a different game all together like Warmachine, or perhaps a Talisman minature!

You'll be surprised at how difficult it can be. Even if you use the same colors you normally do. Just the different model, textures, scale and such will throw your game off. You'll find yourself focusing on things you normally take for granted. You'll hit bumps in the road where it's normally smooth sailing.

All of these things will help you get better. You might find a new technique or trick you never knew before because you've had to improvise this time around. You might find a new color combination or method for applying paint you never tried before. All things that will improve your work when you head back to the normal stuff.

I've painted a few models, meaning I can count them all on one hand, that were "different" from what I normally do. And I learned something from every one of them. If you don't have the ability to go out and buy something different to paint, you can try pushing yourself to try something you haven't done before.

While it may not be as big of a leap, it will still help you out with your painting overall. Never done a quartered Space Marine scheme in contrasting colors? Give it a go on a test model. You can always strip the paint and never tell anyone you painted another chapter. Your friends don't have to know.


And it doesn't have to be Golden Daemon stuff either. In fact, you don't even need to finish the model if you don't want to. Sometimes I'll paint a shoulderpad just to try something out. The point is, you need to get out of your comfort zone when it comes to painting and try something you haven't done before.

As always thanks for visiting the site, if youve any questions or comments please feel free to share them! You can help us out by viewing any of the adverts on the side of the page, using the donate button or just browsing the site! Thanks for visiting from the SciFiWargamers team.